How to Recover Deleted Photos Even After Emptying Recycle Bin
It is very regrettable to lose important photos. Many people accidentally delete family photos, travel memories, work images and other valuable files. In some cases, the recycle bin is emptied and the photograph is permanently disappeared. But there is good news. In many instances deleted photos can be recovered if the action is timely and the right way is used. This guide will tell you about the process of restoring from Recycle Bin, why deleted photos can be retrieved again even after you have emptied Recycle Bin and how to recover deleted photos after emptying Recycle Bin.
Part1: Why Deleted Photos Can Still Be Recovered
Many users assume that deleting a photo from their computer is the same as physically removing it. Typically, Windows does not operate that way. When you delete a photo, normally it is moved to the “Recycle Bin”. The file is still there until you empty the recycle bin to restore it. When you delete files from the Recycle Bin, Windows does not usually delete the actual data from the files. Rather,it marks the storage location as being available for new data. Until a new file overwrites that area, recovery software may be able to locate and restore deleted photos. This is why many users realize that they have deleted something important and look for a recovery solution from Recycle Bin.
Act Quickly After Deletion
To maximize the probability of restoration success, stop using the drive immediately.
What to avoid:
- Download New File
- Installing programs on affected drives
- Copying large amounts of data
- Save new photos and videos
Downloaded data may cover over deleted files and lower the success rate of recovery. So if you want to restore deleted files after emptying the Recycle Bin, the answer is simple: you need to use a reliable recovery method before data gets overwritten.
Part 2: Common Situations That Lead to Photo Loss
There are many reasons why photos disappear. Below are some of the most common situations that users face.
Accidentally Deleting Photos and Emptying Recycle Bin
This is one of the most common causes of photo loss. This is a case where users notice that they deleted unnecessary files, emptied the recycle bin, and then included important photos. The standard restore option will no longer work because the recycle bin is already empty.
Using Shift + Delete
The Shift + Delete key shortcut removes the file completely without going through the Recycle Bin. Many users use this shortcut to save time, but later you may notice that important photos were accidentally deleted.
System Crash or Disk Cleanup
Unexpected system problems may result in file deletion without warning.
Examples include:
- Windows Crash
- Update Failure
- Cleanup Disk Operations
- Partition Error
These problems can cause loss of photos and may require professional restoration software.
Virus Attacks or Corrupted Storage Devices
Malware and viruses may corrupt files, hide photos, or delete them completely. Some harmful programs can also affect storage devices and make files inaccessible. Photos stored on an SD card, USB memory, or external hard drive can disappear when the device is damaged.
Common causes include:
- Improper removal
- File System Errors
- Power outage
- Physical Damage
In many cases, you can use recovery software to find lost photos.
Part 3: How Recycle Bin Recovery Works
By understanding the recovery process, you can make appropriate decisions after data loss.
Recycle Bin Is Temporary Storage
Normally, when you delete a file, Windows sends it to the Recycle Bin. The file will remain in the Recycle Bin until one of the following is done:
- Manually restore
- Delete completely
- Empty the Recycle Bin
Restoring from the Recycle Bin is easy because Windows keeps files in a temporary location.
What Happens After Emptying the Recycle Bin?
If the Recycle Bin is emptied, Windows removes its reference to the file but frequently the data in the file still exists on the drive. The storage area is marked as available for new data, but the actual photo files remain intact until they are overwritten by new information. That’s why you’re able to get deleted photos back after emptying the Recycle Bin with professional Recycle Bin recovery software.
Why Specialized Recovery Tools Are Needed
In most cases, Windows doesn’t include any built-in recovery capabilities for permanently deleted files. Once a file is removed from the Recycle Bin, you’ll typically need professional data recovery software to scan the storage device and retrieve the lost file. These tools are used to find the records of deleted files in the drive and restore the available data.
Part 4: How to Recover Deleted Photos (Step-by-Step)
There are several ways to restore deleted photos. First of all, let’s try from the easiest way.
Step 1: Check Recycle Bin First
Before using the restore software, check if the photo is still in the recycle bin.
How to Recover Photos from Recycle Bin
- Open the desktop recycle bin.
- Search for deleted photos.
- Select the file you want to restore.
- Right-click the selected file.
- Click “Restore”.
Windows will restore the file to its original location. If there is no photo in the recycle bin, proceed to the following method.
Step 2: Use Professional Recycle Bin Recovery Tool (Recommended)
When photos are permanently deleted from the Recycle Bin, many users assume they are gone forever, but that is not always true. Modern recovery technology makes it possible to restore lost images from hard drives, SSDs, USB drives, and memory cards even after emptying the Recycle Bin. One of the most reliable solutions is using a professional recovery tool like 4DDiG Data Recovery. It is designed to deeply scan storage devices and find deleted files that are still recoverable. With advanced scanning and preview features, users can safely restore important memories without technical skills, making photo recovery faster, easier, and more reliable.
Key Features of 4DDiG Data Recovery:
- Recovers permanently deleted photos even after Recycle Bin is emptied, using deep scan technology to locate hidden or lost image data safely.
- Supports 2000+ file formats including JPG, PNG, GIF, RAW, TIFF, and more for complete photo and media recovery coverage.
- Works across multiple storage devices such as internal hard drives, SSDs, USB flash drives, SD cards, and external storage drives.
- Offers free scan and preview feature allowing users to check recoverable files before restoring them to ensure accuracy and safety.
- Simple and beginner-friendly interface designed for non-technical users with step-by-step recovery process for quick and easy restoration.
Step 3: Recover Photos Using 4DDiG
To restore deleted photos, follow the steps below.
1): Download and install 4DDiG Data Recovery on your system, then open the program to start the recovery process easily.
2): Choose the exact drive (C, D, or external device) where your deleted photos were originally stored before removal.
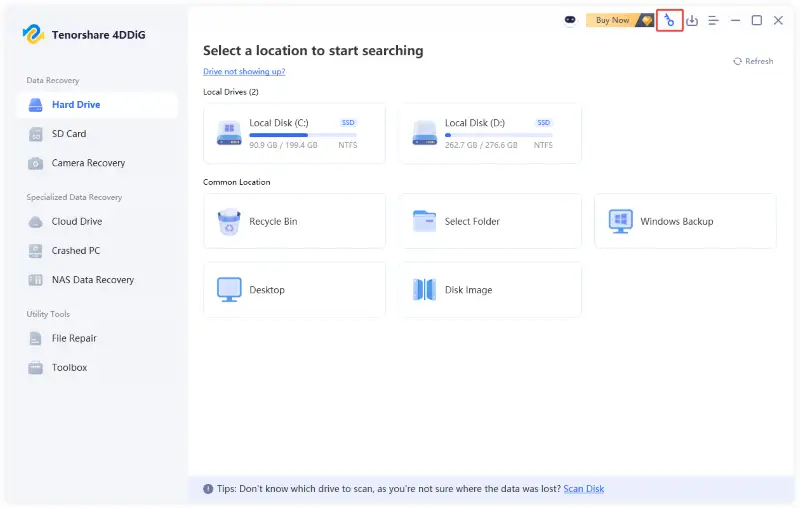
select the disk where photos were deleted
3): Click the scan option to begin a deep search of the selected drive for deleted or missing photo files.
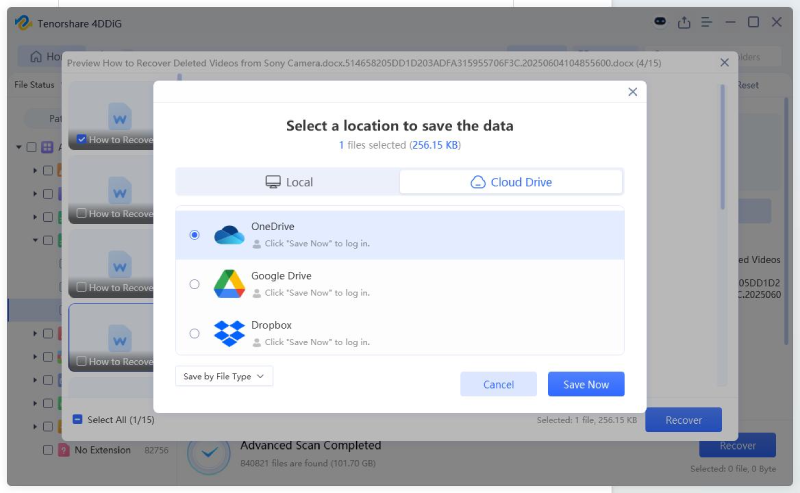
4): Once scanning completes, preview found images to confirm quality, accuracy, and ensure the correct files are selected.
5): Select desired photos and restore them, then save to another drive to avoid overwriting existing recoverable data.
Part 5: Additional Methods to Restore Deleted Photos
Use professional recovery software or other options. If you have backed it up prior to the deletion of the photo, you can try to retrieve it without the recovery software.
Restore Photos Using File History
The File history feature backs up automatically copies files in the folder you select. If you had set up file history prior to deleting the photo, follow these steps:
- Open the folder where the photo was originally saved.
- Right-click in the folder.
- Select Restore Previous Version.
- Select the version that was created before the photo was deleted.
- Click Restore.
This method only works if the file history is enabled before data loss occurs.
Recover Photos from OneDrive
Many Windows users are automatically syncing photos to OneDrive.
To see a backup:
- Sign in to your OneDrive account.
- Open the Photos section.
- Search for lost images.
- Download photos to your computer.
OneDrive also has its own Recycle Bin, which stores deleted files for 30 days before they are permanently removed.
Recover Photos from Google Photos
If your photos are backed up to Google Photos, it may be very easy to restore.
Procedure:
- Open Google Photo.
- Go to the Recycle Bin folder.
- Find deleted photos.
- Select an image.
- Click “Restore.”
In Google Photos, deleted items are usually stored in the Trash for a period of time and then completely deleted.
Check Previous Versions of Folders
Windows may automatically create shadow copies of files through the Volume Shadow Copy Service (VSS), which allows you to restore previous versions of folders even without File History enabled.
How to confirm:
- Right-click the folder where the photo was saved.
- Select Properties.
- Open the Previous Version tab.
- Select the available version.
- Click “Restore.”
If a restore point exists, you may be able to restore deleted photos in this way.
Part 6: Tips to Prevent Losing Photos Again
Deleted photos can often be restored in many cases. It can happen in many situations, but it is best to take precautions. With a few simple habits the memories can be preserved and loss of data can be prevented.
Enable Automatic Backups
Automatic backup is also the most reliable protection if you delete it accidentally.
The following methods are available:
- OneDrive
- Google Photos
- External Hard Drive
- NAS Storage
- Windows File History
By backup regularly, you can always secure copies of important photos at hand.
Avoid Using Shift + Delete
Many users will completely delete the file by pressing Shift + Delete. Before using this shortcut, re-check the selected file. First, sending the file to “Recycle Bin” increases the possibility that it can be restored later.
Review Recycle Bin Before Emptying It
Many people empty the recycle bin without checking the contents.
Before clicking “Empty Recycle Bin”:
- Open the Recycle Bin.
- Check the recently deleted files.
- Make sure there are no important photos left.
This simple procedure prevents you from accidentally losing data.
Store Copies in Multiple Locations
It is risky to store only one copy of an important photo. Consider saving a copy in the following locations:
- Your computer
- External Drive
- Cloud Storage
If there are multiple copies, it will be additional protection even if one of the storage locations fails.
Use Reliable Storage Devices
Low-quality storage devices may fail unexpectedly. Choose a trusted manufacturer’s proven hard drive, SSD, memory card and USB drive. High-quality storage devices prevent data corruption and file loss.
Protect Your Computer from Malware
Viruses and malware can delete or corrupt files.
To mitigate risk:
- Keep your antivirus software up-to-date.
- Download files only from trusted sources.
- No suspicious email attachments are opened.
- Please update Windows regularly.
These steps help protect both photos and computers.
Check Storage Health Regularly
Storage devices are not permanently usable.
Note the following warning signs:
- Poor performance
- Frequent file errors
- File Loss
- Noise from hard drive
You can prevent large-scale data loss by swapping drives that start to fail earlier.
Frequently Asked Questions
Can I Recover Photos After Emptying the Recycle Bin?
Yes. In many cases, the data is not immediately erased from the drive, so photos can be restored after emptying the recycle bin. Restore software often allows you to identify and restore them before a file is overwritten.
How Can We Recover Deleted Files From Recycle Bin After Emptying It?
The most effective method is to use specialized Recycle Bin recovery software. These tools scan storage devices and search for deleted files that Windows can no longer access in the usual way.
Is Recycle Bin Recovery Always Successful?
This is not always the case. The success of the restoration depends on the following factors:
- How long has passed since deletion
- Whether the deleted data has been overwritten by new files
- Storage Device Status
The faster you start the restore, the more likely you are to succeed.
Can I Recover Photos Deleted with Shift + Delete?
Yes. Deleted files using Shift + Delete keys are often recoverable until they are overwritten with new data. With the recovery tool, you can find and restore those files.
What Types of Photos Can Be Recovered?
Most restore software supports common image formats such as:
- JPG
- JPEG
- PNG
- GIF
- TIFF
- RAW image file
Many tools can also restore videos, documents, and other file formats.
Should I Save Recovered Files to the Same Drive?
No. It is safer to save recovered files to another drive or destination. This prevents recoverable data from being overwritten.
Final Words
If you get rid of a photo by mistake, it will be a big stress, particularly when the recycle bin is empty. Luckily, deleted photos aren’t always lost forever. A lot of the time, these files are not deleted and will stay there until overwritten by a new file. If the photo is still in the recycle bin, you can recover it with a couple of clicks. When the Recycle Bin is emptied or the file is deleted with the shift + Delete key, the professional Recycle Bin Recovery software is the best choice. If you are a user who has emptied the Recycle Bin and lost all the photos, 4DDiG Data Recovery can be a viable solution for you to retrieve the lost photos from your empty Recycle Bin , hard drive, SSD, USB drive and memory card. The scanning, preview and restore function makes it easy for beginners to restore. The most crucial thing is to act quickly as soon as you realize data loss has occurred.
READ ALSO: The Smarter Way to Localize Content: My Experience Using an AI Voice Generator