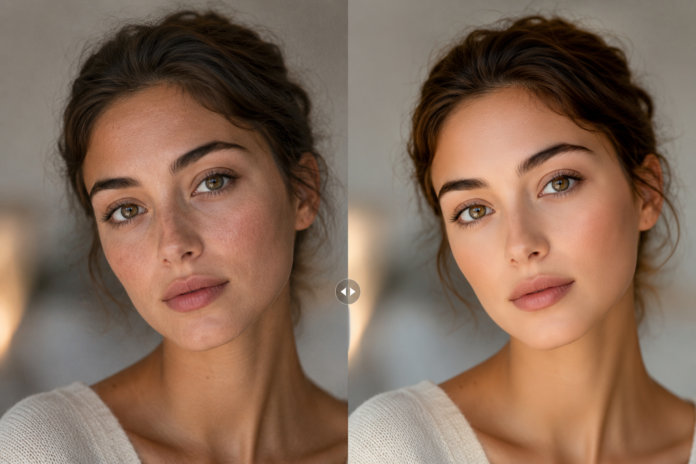

A photo can be quite sharp and still be a bit raw. A portrait might have a slightly uneven skin texture, the bright light may have caused minor distractions in your image, or digital grain may be present due to shooting in difficult conditions. A bit of grain isn’t so much of a problem, but if it starts taking the focus away from your subject, then you should address it in photo editing.
Smoothing in image processing can remove noisy texture and small flaws, making key features look as they always have. Image smoothing is particularly required in portraits. They require tact and consideration to preserve a polished appearance while making the image look naturally real.
In this article, we will see how image smoothing tools work and why they are useful for improving photo quality. You will learn to apply this technique effectively without sacrificing the natural look of your photos.
What Is Image Smoothing?
Image smoothing refers to reducing small variations in texture or tone to create a more even appearance. It is commonly used to refine skin texture and eliminate digital noise. It may help refine lifestyle images, social media photos, or other pictures where you want a cleaner overall appearance.
A good smoother should make the picture look polished without overprocessing. Your task is to make the subject look good without viewers noticing the photo has been edited. We will learn to do it in the following section.
How to Smooth an Image Without Making It Look Artificial
Natural-looking smoothing may seem overwhelming at first, but you can start with AI-based editors that will automatically set you a reliable baseline. One of such tools is Luminar. It particularly includes Skin AI to maintain a natural skin texture. The tool also provides separate controls for reducing shine and visible skin imperfections. Here is what you need to know when you start using it:
1. Prioritize Subtlety
Once you decide what to adjust after viewing the photo in real time, be subtle. Targeted, minimal changes in post are the magic ingredients in portrait photos. In Luminar, Skin AI even includes an Amount control. This feature limits the slider’s strength and eliminates those plasticky, fake effects. Use amounts judiciously, and keep going until irritating distractions fade away, rather than until every wrinkle and texture vanishes.
2. Keep the Details
A good image smoother allows users to address minor imperfections and shine separately, rather than smoothing the whole frame. You need to keep the most vital details and facial characteristics crystal clear and well-defined. Once blended, verify how the subject’s eyes, eyebrows, lips, hair, and contours are sharp. They reveal a great deal about the person, so defining them can make or break a portrait; if it appears to have turned mushy or soft, step back a little and try applying the correction to a lesser extent. Non-destructive editors like Luminar let you go back to try different applications without losing the original file.
3. Don’t Use Smoothing To Fix Lighting Issues
Sometimes what looks like a texture issue is really caused by harsh or uneven light. Adding more smoothing will not solve the underlying problem. Consider adjusting brightness, contrast, or highlights first, then reassess the image.
4. Use Complementary Image-Enhancement Techniques
Even if smoothing is your main post-processing task, treat it only as a part of the creative process. Experiment with and explore other tools your software offers to make the final photo look better. In Luminar, Enhance AI can help refine a photo’s overall appearance, while Structure AI can add definition where more detail is needed. For portraits, Face AI provides additional controls for refining facial features and lighting.
5. Maintain a Consistent Look
If you are preparing several portraits from the same session, use a similar level of refinement across the set rather than treating every image completely differently. But keep in mind that the images within one project should not look identical. Let the photograph guide your choices. Some images need barely any smoothing, while others may benefit from a little more refinement.
6. Refine Your Photo Manually After Automatic Smoothing
Automatic smoothing tools can be a helpful starting point, but they rarely match the needs of every photo. Skin tones, lighting conditions, and image quality vary too much for a one-click solution to be perfect. Subtle manual tweaks will keep your images natural and cohesive.
7. Review Constantly
A quick comparison with the original can reveal whether the adjustment is helping or going too far. Step back from the screen and view the whole portrait rather than judging only a zoomed-in section. If the result looks clean but still resembles the original person and lighting, you are doing everything right.
Conclusion
Good photo editing is not about changing everything you can. It is about knowing which small adjustments will make the image work better. Smoothing can help portraits and everyday photos look cleaner. Choose a photo you already know well, try a light smoothing adjustment, and see how it changes the overall impression. Once you learn where the effect helps and where it goes too far, you can use it with much more confidence.